


I love this recipe!!!
I found it on Pinterest as part of a collection of recipes using muffin tins: 24 Awesome Muffin Tin Recipes. There are a bunch of recipes on here that I plan on trying, but I ended up going for the Chicken Pot Pies first. You can find the original recipe over at Quick Dish.
This is what the recipe says you need, followed by what I actually used.
- 1 Chicken breast, poached and diced (I just used a can of chicken chunks, found next to the tuna at the grocery store.)
- 1 can of cream of chicken soup (they say 14.5 oz, but as far as I know they only sell the 10.5 oz size and it worked just fine.)
- 1 cup frozen mixed veggies (I used carrots, peas and beans.)
- 1 cup shredded cheddar cheese.
- 1 tbs Herbs De Provence (I didn’t have this so I just mixed 1/4 tsp of the following dried herbs that I already had in my spice rack: Savory, Rosemary, Thyme, Oregano, Basil, Marjoram, then measured out 1 tbs out of that mixture. I’ll hang onto the rest and use it later for more of this, or something else!)
- 1 tsp onion powder
- 1 tsp garlic salt (Not powder! Salt! There’s a HUGE difference! If you use powder it’s going to be WAY more garlicy vs using the salt!)
- 2 (10 oz) cans Pillsbury biscuits. (I can’t bring myself to spend the money on something like this, when I can easily make it myself! I ended up using this recipe I found over at Pinch My Salt – I’ll go over that at the end!)
The pot pies were SO easy to make!
1. Preheat oven to 400.
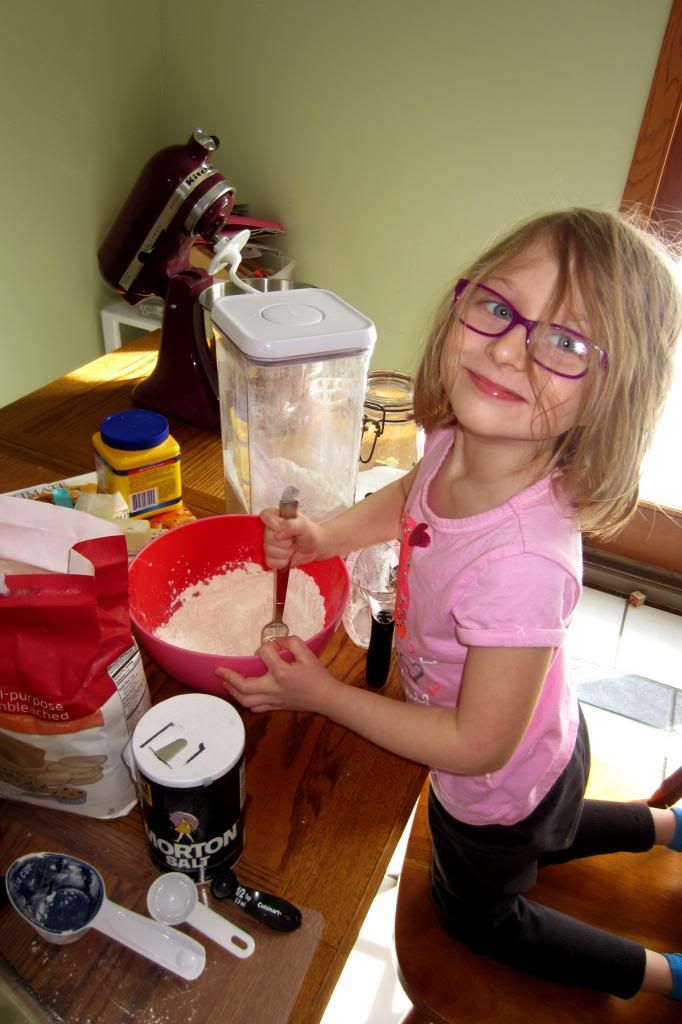
2. In a medium sized bowl, dump in everything except the biscuits (obviously.) Mix well.
3. Lightly grease your muffin tin and press the biscuits in. I kind of pressed in with my fingers and pulled it around the side.

Push them in even more than this. I forgot to take a photo when I was done pressing them in. Whoops?
4. Spoon the mixture into each biscuit, filling a lot.

Fill ’em up! Then keep going!
5. Bake for 15 minutes. My oven is ancient and I don’t trust it, so I usually check at 7 minutes and go from there.
6. Let cool a few minutes and enjoy! You should be able to pop these out with your fingers, but if that doesn’t work you can always slide a knife along the side to get some leverage.

Enjoy! I cut the kids in half to make it easier for them to take bites out of, but I kept mine whole and enjoyed it just like a cupcake!
After everyone had eaten we had 2 biscuits remaining (I believe this made 9 pot pies… using the non-pre-packaged biscuits) – I froze the left-overs and I’m hoping they re-heat well!
Part 2: Biscuits
As I mentioned above, I got my biscuit recipe from Pinch My Salt. I don’t see the point in buying biscuits from the grocery store when they’re SO easy to make!
The following is Pinch My Salt’s recipe, with my minor changes next to it.
- 1 & 1/4 cup cake flour (I didn’t want to shell out the extra cash for cake flour, so the internet taught me that for each cup of All-Purpose flour simply remove 2 TBSP of the flour and replace with 2 TBSP of corn starch. I did that for the first cup of flour, then for the 1/4 cup I filled my 1/2 TBSP measuring spoon half full (do they even MAKE 1/4 TBSP measuring spoons???) and then filled the rest of the way with all purpose flour.)
- 3/4 cup all-purpose flour.
- 1 1/2 tsp baking powder.
- 1/2 tsp salt.
- 1/4 cup butter, cut into small chunks.
- 3/4 Cup buttermilk (I don’t buy my own. I just took 1 tbsp of lemon juice – or you can use white vinegar – let sit for at least 5 minutes, I stirred mine but I don’t know if you actually have to… and ta-da! Buttermilk! I froze in an ice cube tray the left-over. 1 TBSP in each cube.)
To cook the biscuits on their own, the recipe says to bake at 500*. In my recipe above, they cooked just fine as the pot pie base cooking at around 400* but if I make them again as just biscuits, I’ll bake at 500*.
Here are the steps to making the biscuits: (Her works, not mine, I’ll ask my notes in parentheses.)
1. Cut butter into small chunks, place in bowl and return to fridge.
2. Measure out buttermilk and set aside.
3. Sprinkle flour on a work surface and have extra flour nearby for your hands and biscuit cutter. Have biscuit cutter and an ungreased baking sheet handy.
4. Mix dough: In a medium-large bowl, wisk together flour, baking powder, baking soda and salt until well blended. (I used a fork.)
Feel free to delegate your mixing! Allison was happy to help with both pouring in the ingredients and mixing!
5. Add butter and cut into flour using a pastry blender, two knives or your fingertips, until mixture resembles coarse crumbs. (I found my fingers to work best. I have never used a pastry blender, but I’ve used forks in the past and it was terrible! I’m using my hands from now on!)
6. Pour in buttermilk and stir lightly until dough comes together in a ball.
7. Dump dough mixture onto well floured work surface. With floured hands, lightly knead dough a few times until it is fairly well blended. Pat into a circle, 3/4-1 inch thick (I didn’t measure mine, I guesstimated.)
8. Dip cutter into flour and cut biscuits without twisting the cuter. (Yeah… I don’t have a cutter…. I searched the kitchen for an object that was roughly the same size as the muffin tin openings and came up with the lid for a kid’s cup from Olive Garden. I pressed it in pretty hard, then tore around the “perforated” circle.)
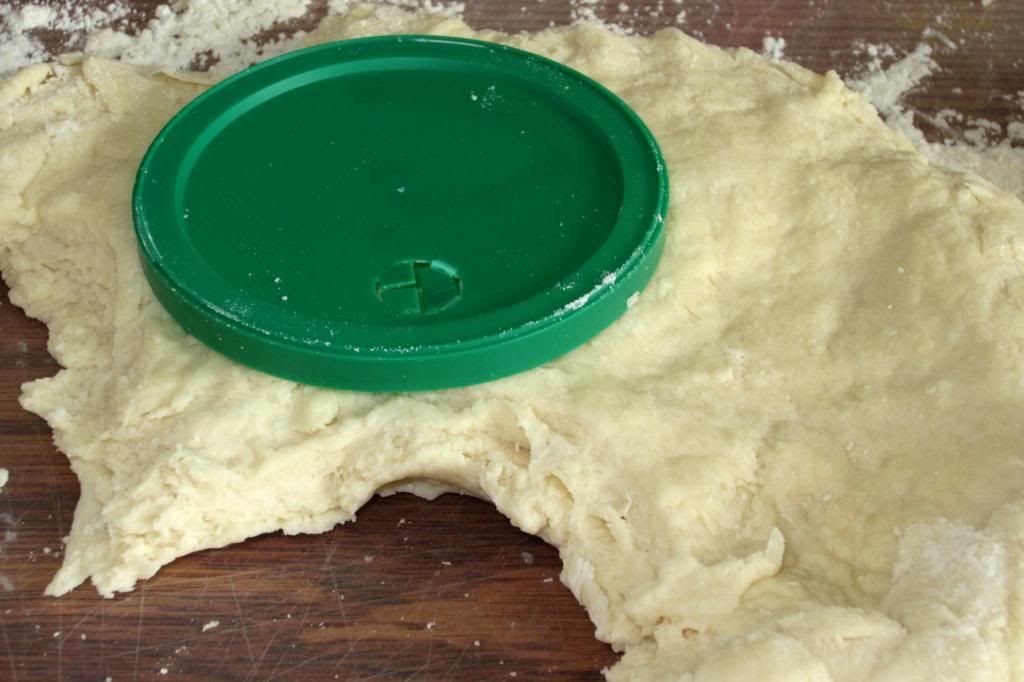
My make-shift biscuit cutter. Thanks Olive Garden! It worked out perfectly!
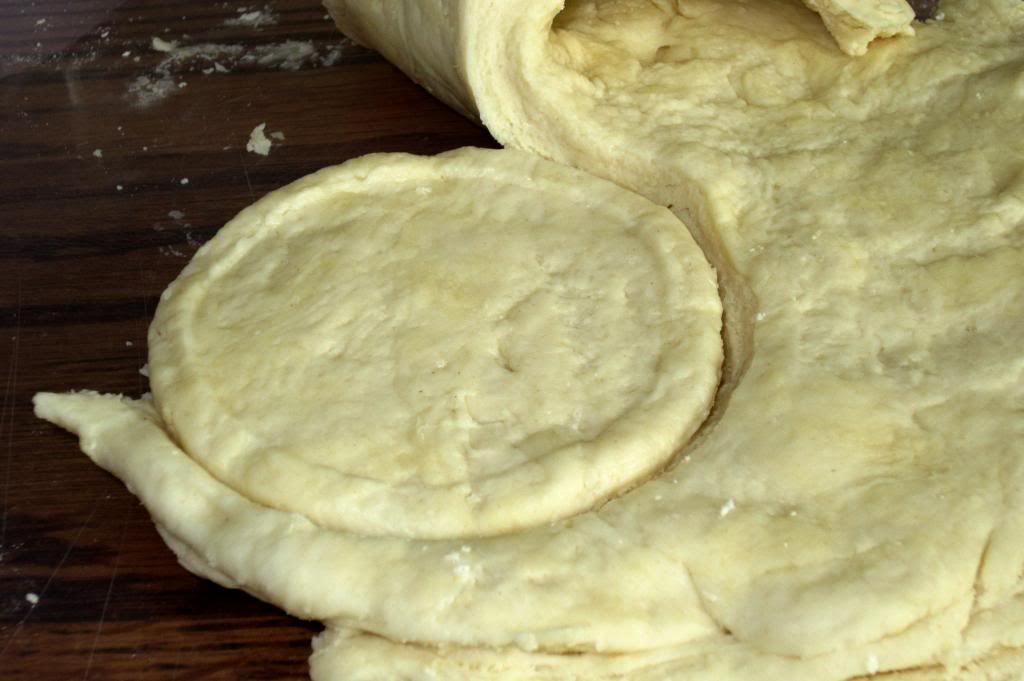
Removed the lid and tore the dough from around the circle. Worked great!
9. Once I’d cut everything out, I re-rolled the scraps and cut again. The small remaining piece of dough I just made into a ball and placed in an open muffin slot and baked as a tiny biscuit. (For the pot pies above.)
10. Bake biscuits: place baking sheet in the middle of a preheated 500 degree oven and bake 8-10 minutes until they are golden brown. Remove biscuits to a wire rack to cool for a few minutes. Enjoy!
