


I’m a terrible blogger. I know, I know…..

Pizza Bread
This is a recipe I recently made for my meal swap group. The above photo features meatballs, but for my meal swap group we did pepperoni.
SUPER easy and tasty!
You basically take my grandmother-in-laws pizza dough recipe, double it, slice the dough into 6 pieces, roll the dough out, pour on some sauce, put the pepperoni, add the cheese and roll it up (carefully!!!)
For the bread:
INGREDIENTS:
- 1 Package active dry years
- 3/4 cup very warm water
- 2 TBSP Olive oil (or vegetable oil)
- 1/2 tsp sugar
- 1/2 tsp salt
- 2 cups flour
DIRECTIONS:
1. Add the package of yeast to the water. let sit for 5 minutes as the yeast does its thing. The water should be hot, but not TOO hot – you don’t want to kill the yeast!
2. Add the sugar, salt and oil to the water.
3. Mix in flour. You can either use a mixer (I use my Kitchenaid Stand Mixer) or you can knead by hand, for about 5 minutes.
OPTIONAL: The dough is ESPECIALLY good if you add in some pizza herbs and seasoning! I like to add garlic powder, onion powder, Italian Seasoning, Basil, Oregano, etc. SO yum!
For the sauce I use the recipe here.
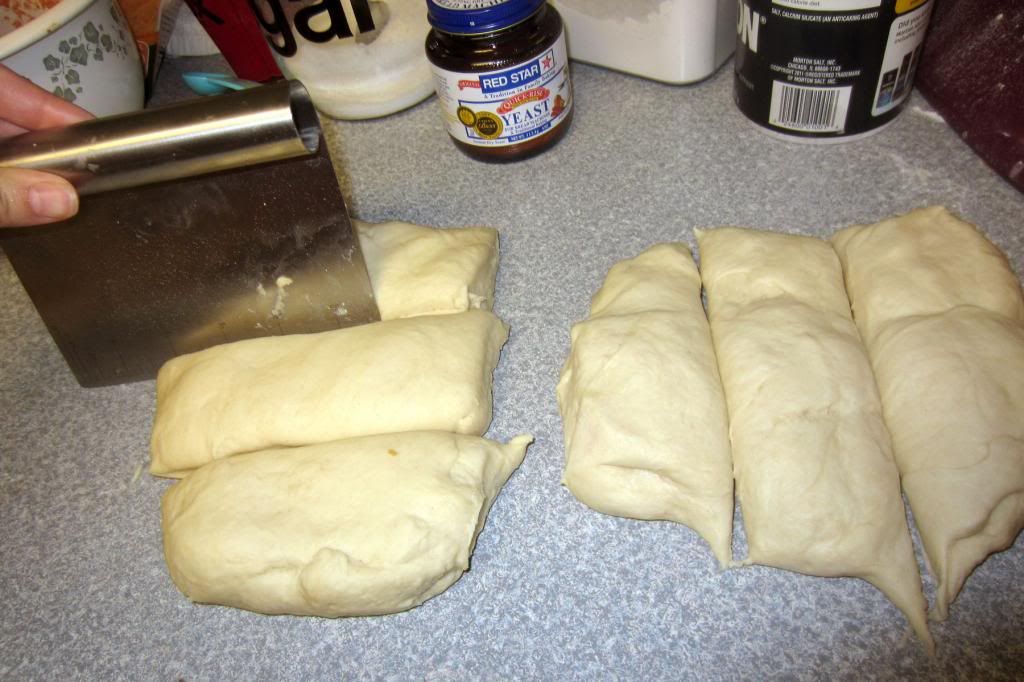
Cut the dough

Putting together the pizza bread!
ASSEMBLING THE BREAD:
1. Divide the dough. Shape it into a nice round (or square) lump and cut in half, then cut each half into thirds. These are just guidelines, you can really make as many or as few as you want. What I like about making them small is that each person can have their own roll, plus when the bread is smaller it cooks quicker!
I have an actual dough cutter (I believe it’s Food Network brand? From Kohl’s?) and I LOVE it! It cuts through the dough SO well and scraps any dough left on the counter right off! You can also use a knife if you don’t have a dough cutter/scraper.
2. Spread out one of the little rolls of dough you cut in the previous step. Spread as THIN as you can without tearing any holes. If you do get a hole you can kind of fold the dough back over and try again. You want it thin though because it’s going to rise a LOT when you bake it!
3. Spread the sauce across the dough. Careful you don’t get too close to the edges or you’ll have a HUGE mess when you go to roll it up!!! If you’re like me and LOVE sauce, you’re going to have to hold yourself back. You can NOT put a lot of sauce in these! You can certainly DIP the bread in some sauce once it’s baked though!
4. Add your toppings. In this case, pepperoni. You can add whatever you want though. Meatballs, onion, peppers, olives, etc.
5. Add the cheese! You can probably even put more than I put on in the photo!
6. Now the messy part! ROLLING the bread! Start at one end and instead of actually ROLLING the bread over, it’s best to sort of FOLD it. I find what’s easiest is to fold it, pinch the edges, fold, pinch, etc. Then at the end you need to seal the edges. Pinch them shut and kind of smooth them over with your finger.
7. Finally you’re ready to bake and eat your creations!
Preheat the oven to 425* and bake for 10-15 minutes. The bake time is going to depend on the size you end up making your bread and your oven. My oven is ancient and terrible so I ALWAYS check the food at the halfway point. Since these times are based on MY oven, keep a close eye on your food!
8. Enjoy! Allow the bread to cool down a bit. When we make it for the kids we always cut it open first to let the inside cool off so they don’t burn their little mouths. I like to heat up some sauce as well to dip mine in because, as I said above, I’m a sauce lover!
FREEZING: I froze these for the meal swap group. I put 3 each in the gallon sized ziplocks. Each person got 6 bread rolls. Thaw completely prior to baking.
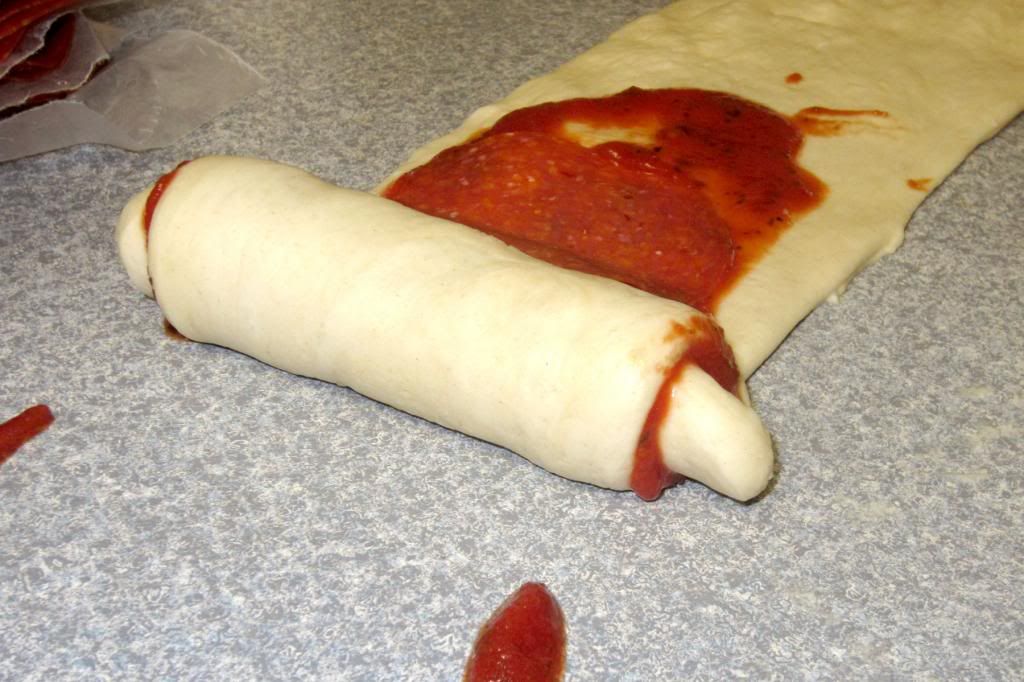
Roll the dough! This is a bad example… I had a bit too much sauce, did not pinch the edges as I rolled AND forgot the cheese!!! #FAIL
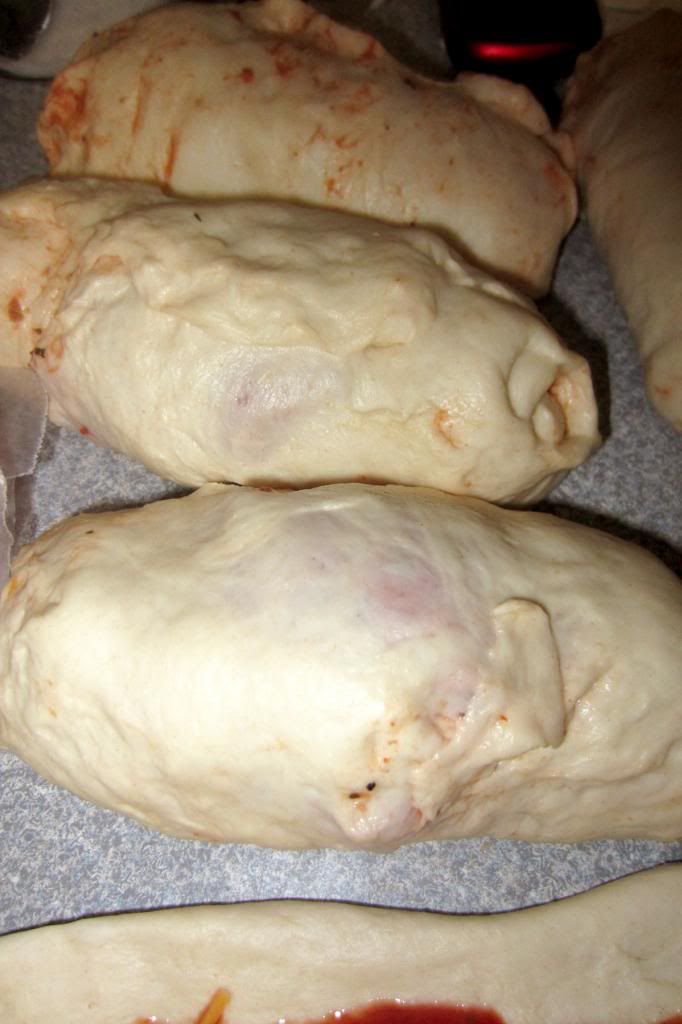
Seal and smooth those edges!


